导航
- 引子
- 接入流程
- 安装swag
- 安装gin-swagger
- 项目中集成
- 在项目的
main.go函数中引入 - router中增加swagger的handler
- 访问测试
- 根据swag规范编写接口描述
- 添加server注释
- 配置Controller注释
- 再次测试
- 参考
引子
最近在学习Go语言,找了一个开源项目来学习。该项目基于Ginweb框架,可以输出restful接口,但是没有办法查看接口文档。
在.net项目或者Java项目中,我们一般会集成swagger插件,然后就能自动生成接口文档,方便前后端开发人员对接。
比如,在.net core项目中集成swaggerUI,可以参考这篇文章《在ASP.NET CORE 中的使用swagger》。
举一反三,我想Go项目中应该也有类似的插件,于是简单搜索了一下,"Gin+swagger",手气不错,还真有的插件!
接下来,我们就一步一步实现Gin集成Swagger文档吧!
接入流程
接入流程主要分为以下几个步骤:
- main 文件中添加注释-配置 Server,服务信息
- controller 中添加注释-配置接口,接口信息
- swag init 生成 docs 目录
- 配置 handler 访问
安装swag
下载swag依赖
用vscode打开我们的go web项目,进入根目录(main函数所在目录),输入go get github.com/swaggo/swag/cmd/swag
PS D:\projects\go\zhikecore-bigmodel-gateway> go get github.com/swaggo/swag/cmd/swag
go: downloading github.com/swaggo/swag v1.16.3
go: downloading github.com/go-openapi/spec v0.20.4
go: downloading sigs.k8s.io/yaml v1.3.0
go: downloading github.com/urfave/cli/v2 v2.3.0
go: downloading github.com/KyleBanks/depth v1.2.1
go: downloading golang.org/x/tools v0.7.0
go: downloading github.com/go-openapi/jsonpointer v0.19.5
go: downloading github.com/go-openapi/jsonreference v0.19.6
go: downloading github.com/go-openapi/swag v0.19.15
go: downloading github.com/cpuguy83/go-md2man/v2 v2.0.0-20190314233015-f79a8a8ca69d
go: downloading github.com/mailru/easyjson v0.7.6
go: downloading github.com/PuerkitoBio/purell v1.1.1
go: downloading github.com/russross/blackfriday/v2 v2.0.1
go: downloading github.com/PuerkitoBio/urlesc v0.0.0-20170810143723-de5bf2ad4578
go: downloading github.com/josharian/intern v1.0.0
go: downloading github.com/shurcooL/sanitized_anchor_name v1.0.0
go: added github.com/KyleBanks/depth v1.2.1
go: added github.com/PuerkitoBio/purell v1.1.1
go: added github.com/PuerkitoBio/urlesc v0.0.0-20170810143723-de5bf2ad4578
go: added github.com/cpuguy83/go-md2man/v2 v2.0.0-20190314233015-f79a8a8ca69d
go: added github.com/go-openapi/jsonpointer v0.19.5
go: added github.com/go-openapi/jsonreference v0.19.6
go: added github.com/go-openapi/spec v0.20.4
go: added github.com/go-openapi/swag v0.19.15
go: added github.com/josharian/intern v1.0.0
go: added github.com/mailru/easyjson v0.7.6
go: added github.com/russross/blackfriday/v2 v2.0.1
go: added github.com/shurcooL/sanitized_anchor_name v1.0.0
go: added github.com/swaggo/swag v1.16.3
go: added github.com/urfave/cli/v2 v2.3.0
go: added sigs.k8s.io/yaml v1.3.0
验证swag依赖
在 cmd 窗口输入swag或者swag -v
这时候可能会出现swag 不是内部或外部命令,也不是可运行的程序或批处理文件报错。
出现这种情况,我们需要检查Go的环境变量GOPATH中的bin目录下(比如:C:\Users\Vcom\go\bin)是否有 swag.exe 文件(可运行程序)。
如果没有找到swag.exe文件,那么在cmd窗口确实运行不了swag程序。
使用go env命令查看go的环境变量
PS D:\projects\go\zhikecore-bigmodel-gateway> go env
set GO111MODULE=on
set GOARCH=amd64
set GOBIN=
set GOCACHE=C:\Users\Lenovo\AppData\Local\go-build
set GOENV=C:\Users\Lenovo\AppData\Roaming\go\env
set GOEXE=.exe
set GOEXPERIMENT=
set GOFLAGS=
set GOHOSTARCH=amd64
set GOHOSTOS=windows
set GOINSECURE=
set GOMODCACHE=C:\Users\Lenovo\go\pkg\mod
set GONOPROXY=
set GONOSUMDB=
set GOOS=windows
set GOPATH=C:\Users\Lenovo\go
set GOPRIVATE=
set GOPROXY=https://proxy.golang.com.cn,direct
set GOROOT=C:\Program Files\Go
set GOSUMDB=sum.golang.org
set GOTMPDIR=
set GOTOOLCHAIN=auto
set GOTOOLDIR=C:\Program Files\Go\pkg\tool\windows_amd64
set GOVCS=
set GOVERSION=go1.22.4
set GCCGO=gccgo
set GOAMD64=v1
set AR=ar
set CC=gcc
set CXX=g++
set CGO_ENABLED=0
set GOMOD=D:\projects\go\zhikecore-bigmodel-gateway\go.mod
set GOWORK=
set CGO_CFLAGS=-O2 -g
set CGO_CPPFLAGS=
set CGO_CXXFLAGS=-O2 -g
set CGO_FFLAGS=-O2 -g
set CGO_LDFLAGS=-O2 -g
set PKG_CONFIG=pkg-config
set GOGCCFLAGS=-m64 -fno-caret-diagnostics -Qunused-arguments -Wl,--no-gc-sections -fmessage-length=0 -ffile-prefix-map=C:\Users\Lenovo\AppData\Local\Temp\go-build198797253=/tmp/go-build -gno-record-gcc-switches
我们查到了GOPATH路径如下:GOPATH=C:\Users\Lenovo\go。
于是进入该目录C:\Users\Lenovo\go\pkg\mod\github.com\swaggo\swag@v1.16.3\cmd\swag
在C:\Users\Lenovo\go\pkg\mod\github.com\swaggo\swag@v1.16.3\cmd\swag目录下打开cmd窗口,执行go build, 之后会生成swag.exe文件。
最后把swag.exe文件复制到GOPATH中的bin目录下(比如:C:\Users\Lenovo\go\bin)就可以重新验证swag依赖了。
PS D:\projects\go\zhikecore-bigmodel-gateway> swag -v
swag.exe version v1.16.3
安装gin-swagger
在项目根目录下执行如下命令:
go get -u github.com/swaggo/gin-swagger
go get -u github.com/swaggo/gin-swagger/swaggerFiles
如果出现下面的提示,可能是因为版本升级,则使用 下面链接代替go get -u github.com/swaggo/files
go: module github.com/swaggo/gin-swagger@upgrade found (v1.6.0), but does not contain package github.com/swaggo/gin-swagger/swaggerFiles
PS D:\projects\go\zhikecore-bigmodel-gateway> go get -u github.com/swaggo/files
go: downloading github.com/swaggo/files v1.0.1
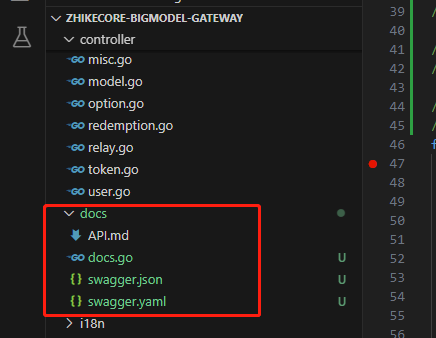
执行swag init命令,会在项目根目录下生成docs目录
PS D:\projects\go\zhikecore-bigmodel-gateway> swag init
2024/08/24 15:48:49 Generate swagger docs....
2024/08/24 15:48:49 Generate general API Info, search dir:./
2024/08/24 15:49:02 create docs.go at docs/docs.go
2024/08/24 15:49:02 create swagger.json at docs/swagger.json
2024/08/24 15:49:02 create swagger.yaml at docs/swagger.yaml
项目中集成
在项目的main.go函数中引入
_ "[您项目的模块名]/docs"
swaggerFiles "github.com/swaggo/files"
ginSwagger "github.com/swaggo/gin-swagger"
router中增加swagger的handler
server.GET("/swagger/*any", func(c *gin.Context) {
ginSwagger.DisablingWrapHandler(swaggerFiles.Handler, "SWAGGER")(c)
})
访问测试
启动,在浏览器中输入http://localhost:3000/swagger/index.html
很好,能访问。但是,好像那里不对?
根据swag规范编写接口描述
添加server注释
func main()
{
}
配置Controller注释
func GetStatus(c *gin.Context) {
}
我们要如何配置,才能让swag将Go的注释转换为Swagger2.0文档呢?
参考这篇文章《Swag将Go的注释转换为Swagger2.0文档》。
再次测试
执行swag init命令,会在项目根目录下生成docs目录
PS D:\projects\go\zhikecore-bigmodel-gateway> swag init
2024/08/24 22:32:08 Generate swagger docs....
2024/08/24 22:32:08 Generate general API Info, search dir:./
2024/08/24 22:32:19 create docs.go at docs/docs.go
2024/08/24 22:32:19 create swagger.json at docs/swagger.json
2024/08/24 22:32:19 create swagger.yaml at docs/swagger.yaml
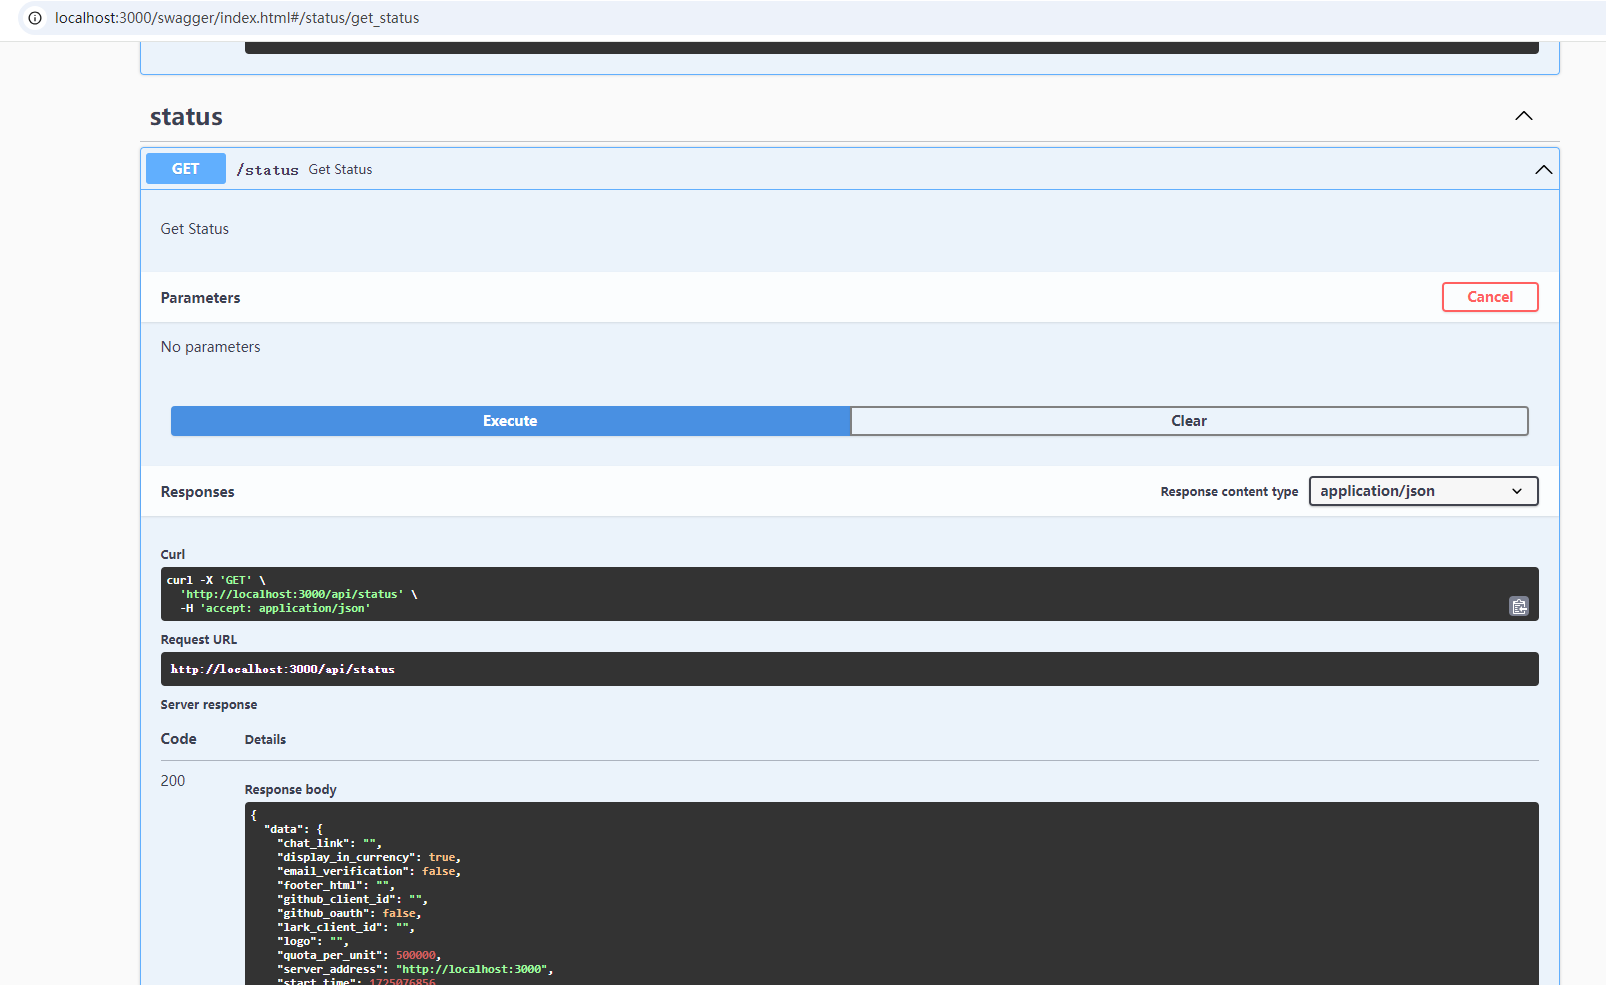
启动项目,在浏览器中输入http://localhost:3000/swagger/index.html
大告功成!
参考